
oMyGudd
oMyGudd is a python plugin, it’s a Generic Udp Device Driver for Channels In and Out within XSI
Content : Plugins/GuddIo.py, Doc/guddIo/ReceiveTest.py, Doc/guddIo/send.pd, Doc/guddIo/GuddIo.html, Doc/guddIo/*.jpg
Because TimerEvent performance was quite bad a few years ago, i’ve started to develop GUDD, a c++ plugin with it’s device manager.
Now it looks a python event can turn about 20fps on my xpPro 32bit (dual3Gig + 1Gig Ram + si 2012), for in or out on 3 sensor with 6 dof each ( 18 datas ).
So here it is :
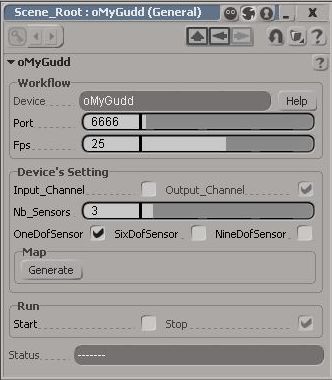
Device : the unique name of this property to manage many instance ( not working yet, Do not change the prop’s name or try many instance … ).
Port sets the UDP port
Fps set the SiTimer « Interval », see notes besides.
Input or Output _Channel : Deprecated si terminology, means it will receive or emit datas.
Nb_Sensors : Choose the number of sensors according to their number of DOF ( Degrees Of Freedom ) : nbChannels = nbSensors * nbDof
OneDofSensor means that only one value per sensor will be send or receive, value is the Y position.
SixDofSensor means 6 value : pos and rot xyz
NineDofSensor means 9 value : pos, rot and scale xyz
Generate Don’t forget to Generate the mapped objects before starting .
Extract DL/last.zip into your %XSI_USERHOME% ( run « Application.LogMessage( Application.InstallationPath( 3 ) ) » in the script panel if you’re not sure ).
In XSI, go to file -> Plugin Manager -> update all.
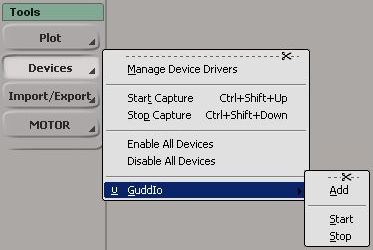
A « GuddIo » submenu shall appear in the Devices menu ( Animate->Tools section ) :
You can put ReceiveTest.py and send.pd where you want
Clic on GuddIo -> Add to add this property to your scene.
After setting your device, clic on the « Generate » button to create needed objects (null) that will be mapped to the device.
TEST Channel Out : Set the device as you want and run the python script ReceiveTest.py : python ReceiveTest.py port=YourPort
You should see something like this (The first data is the actual time ) :
If you want to check performances, try a record :
python ReceiveTest.py port=YourPort rec=MyRecord.txt recFrame=250 tempo=40
This will record 250 frame at 25fps (40ms), so it must took 10second to be run. Once it’s finish, open the MyRecord.txt, the total time used by the script is writen at the end of the log.
TEST Channel In : Set the Device as an Input_Channel, and clic Start.
Xsi will freeze until it get something on the UDP port, so you’d better start the « Sender » first.
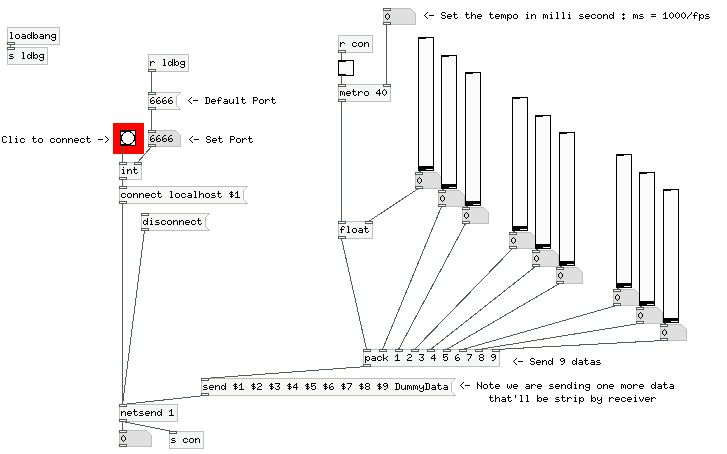
Here is provided a puredata’s patch « send.pd ». Puredata is a very usefull tool for everything, install the pd-extended version : http://puredata.info/community/projects/software/pd-extended
Open the patch, set the port according to your SI config, and clic on the white button on the red background to connect, than use the sliders to modifie sended values :
Notes:
As said in xsisdk doc, the timer event is a little sensitive about performances, and sending or receiving can increase this phenomenon.
If you’re on an Ouput Channel, you can set the frame rate as you wish as it is not bigger than your si view’s fps.
Tip is that realtime will be very closer if you « play » your scene while sending, ( it looks xsi is refreshing better when playing ), and if your receiver is on the same tempo.
On the contrary, if you’re an Input Channel, than the UDP receiver will be a « blocking » socket : it’ll freeze xsi untill it get a packet.
The good way to set your timing for receiving is to send at a reasonable tempo, for example 40 ms (25fps) and check if you got a « lag ».
If so, that means xsi is slower than the sender, you migth see an fps smaller than 25, let say 20, so just adjust your oMyGudd’s fps to 20, restart the device, you shall be real time. ( example is based on my config )